Multi-dialogue forms on one page
Turning Tables Into Selection Lists
You are here: irt.org | Articles | Dynamic HTML (DHTML) | "The Light Fantastic" [ previous next ]
Published on: Monday 15th March 1999 By: Ryan Detert and Martin Webb
Note:
The examples presented in this article can only be viewed with Internet Explorer 4.0 or better, on the Windows platform.
If you are using a Windows machine, but do not have IE4, we'd recommend that you download IE4 from Microsoft so you can appreciate the examples presented.

|
Microsoft Internet Explorer 4.0 offers a powerful line of DHTML commands and functions. We previously covered many of the Visual Filter effects in the previous Multimedia in Microsoft Internet Explorer article. This time we return to the one main Visual Filter that we left out: Lights. |
As mentioned in the previous article, Visual Filters can be used to manipulate both regular text, as well as images. Here is an example of text-manipulation using the glow() filter:
The code that performed the task was simply:
<DIV STYLE="width:150; height:20; filter:Glow(color=red; strength=50)">
This logo is glowing!
</DIV>
Initializing a Light Filter requires the following syntax:
<IMG SRC="image.gif" STYLE="filter:Light;">
This Light filter control can then be used by JavaScript to apply various Light methods to the image object.
There are seven Light Filter methods:
The AddAmbient() method can be used to either dim or strengthen the light cast on an image. This means that you can make a picture brighter or darker by placing a virtual light over the image. The ambient light may also be any 24-bit color composed of an RGB triplet.
Syntax:
object.filters.Light.AddAmbient(R,G,B,Strength);
<DIV ID="AmbientId" STYLE="width:320; height:240; filter:Light">
<IMG SRC="image.jpg" WIDTH="320" HEIGHT="240">
</DIV>
|
| Source: |
The AddCone() method is one of more interesting Light Filter methods. However, this filter requires a little bit of 3-Dimensional Cartesian Co-ordinate understanding (x, y, z), and is thus slightly more cryptic than any of the other filters. This light is literally projected as a cone. With this, picture a cone in your mind, then look at its vertex. This vertex is placed at the 3D co-ordinate (x, y, z) where (0, 0, 0) is the top left corner of the image. The more you increment the z-value, the closer towards you the vertex appears. A target (x, y) co-ordinate value is also specified, in which the center of the cones base will be located. The light is brightest at its defined origin, the cone's vertex. This method also requires a strength setting and a spread variable that represents the width (in degrees) of the cone as it projects from its origin. The coned light may also be any 24-bit color composed of an RGB triplet.
Syntax:
object.filters.Light.AddCone(x1,y1,z1,x2,y2,R,G,B,Strength,Spread);
<DIV ID="ConeId" STYLE="width:320; height:240; filter:Light">
<IMG SRC="image.jpg" WIDTH="320" HEIGHT="240">
</DIV>
|
|
| Source: |
The AddPoint() method behaves in very much the same way that the AddCone() method does. However, the results are slightly different. Unlike the spot light cast on an image using the AddCone() method, the AddPoint() method casts what is known as an omni spot light, which is most like an illuminated blotch of light focused on a specified region.
Syntax:
object.filters.Light.AddPoint(x,y,z,R,G,B,Strength);
<DIV ID="PointId" STYLE="width:320; height:240; filter:Light">
<IMG SRC="image.jpg" WIDTH="320" HEIGHT="240">
</DIV>
|
|
| Source: |
This method changes the light color of any previously applied Light Filter. There two important things to note while using these next few filters, the lightnumber and fAbsolute property. You must access the previously applied Light filters by the number index in which they were accessed. For example, if you used the AddAmbient() method first, then it would be indexed as lightnumber=0. The fAbsolute property will be discussed in other methods as well, it basically tells the browser exactly how you would like to apply the method. For instance, using the ChangeColor() method, if fAbsolute is true the light is changed to the specified color, but if it is false the light is decremented or incremented accordingly, based on the RGB values.
Syntax:
object.filters.Light.ChangeColor(Lightnumber,R,G,B,fAbsolute);
|
|
| Source: |
This method is used in exactly the same way as the ChangeColor() method except that it alters a previously applied Light filter's intensity.
Syntax:
object.filters.Light.ChangeStrength(Lightnumber,Strength,fAbsolute);
|
|
| Source: |
This filter deletes all lights associated with an object. This filter is pretty straightforward.
Syntax:
object.filters.Light.Clear;
This is the final Light Filter. It is used to change the location of either a cone light or point light. For cone lights, this method alters the light's focus, which are the x and y attributes. For point lights, this method moves the entire light to a new x ,y and z location. Note that it has no effect on ambient lights.
Syntax:
object.filters.Light.MoveLight(Lightnumber,x,y,z,fAbsolute);
|
|
| Source: |
There are, however, limitations on Light Filters:
<DIV STYLE="filter:Light;"><IMG SRC="image.gif">This is some text</DIV>
<IMG SRC="image.gif" STYLE="filter:Light Light1;">

<SCRIPT LANGUAGE="JavaScript"><!--
if (document.all) {
    default.filters.Light.AddAmbient(...);
    default.filters.Light.AddCone(...);
    default.filters.Light.AddPoint(...);
    default.filters.Light.AddAmbient(...);
    default.filters.Light.AddCone(...);
    default.filters.Light.AddPoint(...);
    default.filters.Light.AddAmbient(...);
    default.filters.Light.AddCone(...);
    default.filters.Light.AddPoint(...);
    default.filters.Light.AddAmbient(...);

    // to add an eleventh filter:
    default.filters.Light1.AddCone(...);
}
//--></SCRIPT><IMG ID="default" SRC="image.gif" STYLE="filter:Light;">
<SCRIPT LANGUAGE="JavaScript"><!--
if (document.all)
default.filters.Light.AddAmbient(255,255,255,100);
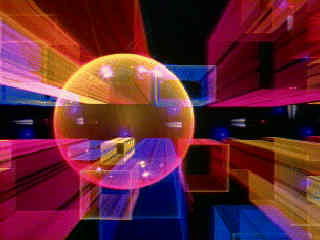
//--></SCRIPT>Finally, the source code for the Light Show shown in the introduction:
<SCRIPT LANGUAGE="JavaScript"><!--
function initArray(num) { for (var j=0; j < num; j++) this[j] = 0; }

// try to speed up by pre-calculating sines and cosine values:
var sinLookup = new initArray(360), cosLookup = new initArray(360);

for (var j=0, h; j < 360; j++) {
    h = j * Math.PI / 180;
    sinLookup[j] = Math.sin(h);
    cosLookup[j] = Math.cos(h);
}

var x  = new initArray(3), y  = new initArray(3); //(x,y) coordinates
var px = new initArray(3), py = new initArray(3); //define center of circles
var angles  = new initArray(3);  //specify angle that light will be rotated from previous (x,y)

var r, z = 84, w = -1;

function init() {
    with (picture) {
        r = width >> 2;               // set radii for all circles

    //set up centers of the 3 light circles
        x[0] = px[0] = width >> 1;    // divide by 2...looks cooler and faster ;-)
        x[1] = px[1] = width * (1/3);
        x[2] = px[2] = width * (2/3);

        y[0] = py[0] = height * (1/3);
        y[1] = py[1] = height * (2/3);
        y[2] = py[2] = height * (2/3);

        filters.Light.AddPoint(x[0], y[0], z, 0xFF, 0x00, 0x00, 90);
        filters.Light.AddPoint(x[1], y[1], z, 0x00, 0xFF, 0x00, 90);
        filters.Light.AddPoint(x[2], y[2], z, 0x00, 0x00, 0xFF, 90);
    }

    rotateCircles();
}

function rotateCircles() {
    // adjust z within limits:
    z += w; if (z<24 || z>84) w *= -1

    for (var i=0; i < 3; i++) {
        // use different step increments so they overlap:
        angles[i] += 10 + i*5; if (angles[i] >= 360) angles[i] = 0;

        // looks cooler if some are going in opposite direction:
        if (!(i % 2)) r *= -1; else r *= (r < 0) ? -1 : 1;

        x[i] = Math.floor(r * cosLookup[angles[i]] + px[i]);
        y[i] = Math.floor(r * sinLookup[angles[i]] + py[i]);

        picture.filters.Light.MoveLight(i, x[i], y[i], z, true);
    }

    window.setTimeout('rotateCircles()', 1);
}
//--></SCRIPT>

<IMG SRC="image.gif" WIDTH="100" HEIGHT="100" ID="picture" STYLE="filter:Light;" ALIGN="left">Despite its complex facade, this demo really isn't all that complicated. First, three point lights were added to the image using the AddPoint() method. The lights were then just rotated in circles at different speeds using some fancy trigonometry functions to pass variables to the MoveLight() method. Don't get hung up on the trigonometry, the important thing is that you understand that the lights were moved using the MoveLight() method. To create the blurry effect, the z-value of the lights were altered so that they appeared to be moving towards and away from the image, thus causing the lights radius to become larger as the z-value became larger and vice-versa.
As you can see from some of these examples, Light Filters add yet another multimedia effect to your images and text. With a small amount of effort you can make your images come alive, and give the impression to your visitors that they are seeing a large image file being loaded without all that strain on the bandwidth. The faster the processor of the computer being used, then the faster the effects. As ever, the usual health warning has to be mentioned when doing any animation - too much animation without any just cause can and will offend people.
Multi-dialogue forms on one page
Turning Tables Into Selection Lists