Controlling Data Entry Using Form Fields
Creating 'Encoded' Name & Value Pairs
Passing data from one form to another
Addressing Form Field Validation with Regular Expressions and JavaScript 1.2
You are here: irt.org | Articles | JavaScript | Form | Chapter 6: Beginning JavaScript [ previous next ]
Published on: Sunday 29th April 2001 By: Paul Wilton
I've put the discussion of checkboxes and radio buttons together, because their objects have identical properties, methods, and events. A checkbox allows the user to tick and untick it. It is similar to the paper surveys you may get where you are asked to "check the boxes that apply to you". Radio buttons are basically a group of checkboxes, with the property that only one can be checked at once. Of course, they also look different and their group nature means that they are treated differently.
Creating checkboxes and radio buttons requires our old friend the <INPUT> tag. Its TYPE attribute is set to "checkbox" or "radio" to determine which box or button is created. To set a checkbox or a radio button to be checked when the page is loaded, we simply insert the keyword CHECKED into the <INPUT> tag. So to create a checkbox, which is already checked, our <INPUT> tag will be:
<INPUT TYPE="checkbox" NAME=chkDVD CHECKED VALUE="DVD">
To create a checked radio button the <INPUT> tag would be:
<INPUT TYPE="radio" NAME=radCPUSpeed CHECKED VALUE="1 GHz">
I mentioned above that radio buttons are group elements. In fact, there is little point in putting just one on a page as the user won't be able to choose between any alternative boxes.
To create a group of radio buttons we simply give each radio button the same NAME. This creates an array of radio buttons going by that name which we can access, as we would with any array, using its index.
For example, to create a group of three radio buttons, our HTML would be:
<INPUT TYPE="radio" NAME=radCPUSpeed CHECKED VALUE="800 MHz">
<INPUT TYPE="radio" NAME=radCPUSpeed VALUE="1 GHz">
<INPUT TYPE="radio" NAME=radCPUSpeed VALUE="1.5 GHz">
We can have as many groups of radio buttons in a form as we want, by just giving each group their own unique name. Note that we have only used one CHECKED attribute, since only one of the radio buttons in the group can be checked. If we had used the CHECKED attribute in more than one of the radio buttons, only the last of these would have actually been checked.
Using the VALUE attribute of the checkbox and radio button elements is different from previous elements we've looked at. Firstly it tells you nothing about the user's interaction with an element, as it's predefined in our HTML or by our JavaScript. Whether a checkbox or radio button is checked or not, it still returns the same value. Secondly, when a form is posted to a server, only the values of the checked checkboxes and radio buttons are sent. So, if you have a form with 10 checkboxes on and the user submits the form with none of these checked, then nothing would be sent to the server except a blank form. We'll learn more about this when we look at server-side scripting.
Each checkbox has an associated Checkbox object and each radio button in a group has a separate Radio object. As mentioned above, with radio buttons of the same name, we can access each Radio object in a group by treating the group of radio buttons as an array, with the name of the array being the name of the radio buttons in the group. As with any array, we have the length property, which will tell us how many radio buttons there are in that group.
For determining whether a user has actually checked or unchecked a checkbox, we need to use the checked property of the Checkbox object. This property returns true if the checkbox is currently checked, and false if not.
Radio buttons are slightly different. Because radio buttons with the same name are grouped together, we need to test each Radio object in the group in turn to see if it has been checked. Only one of the radio buttons in a group can be checked, so if you check another one in the group, the previously checked one will become unchecked and the new one will be checked in its place.
Both Checkbox and Radio have the event handlers, onclick, onfocus, and onblur, and these operate as we saw for the other elements.
Let's look at an example that makes use of all the properties, methods, and events we have just talked about. The example is a simple form, which allows a user to build a computer system. Perhaps it could be used in an e-commerce situation for buying computers online with the exact specification determined by the customer.
<HTML>
<HEAD>

<SCRIPT LANGUAGE=JavaScript>

var radCpuSpeedIndex = 0;
function radCPUSpeed_onclick(radIndex)
{
   var returnValue = true;

   if (radIndex == 1)
   {
      returnValue = false;
      alert("Sorry that processor speed is currently unavailable");
      document.form1.radCPUSpeed[radCpuSpeedIndex].checked = true;
   }
   else
   {
      radCpuSpeedIndex = radIndex;
   }
   return returnValue;
}

function butCheck_onclick()
{
   var controlIndex;
   var element;
   var numberOfControls = document.form1.length;
   var compSpec = "Your chosen processor speed is ";
   compSpec = compSpec + document.form1.radCPUSpeed[radCpuSpeedIndex].value;
   compSpec = compSpec + "\nWith the following addtional components\n";
   for (controlIndex = 0; controlIndex < numberOfControls; controlIndex++)
   {
      element = document.form1[controlIndex];
      if (element.type == "checkbox")
      {
         if (element.checked == true)
         {
            compSpec = compSpec + element.value + "\n";
         }
      }
   }
   alert(compSpec);
}

</SCRIPT>
</HEAD>
<BODY>

<FORM NAME=form1>
<P>
Tick all of the components you want included on your computer
<BR><BR>
<TABLE>
<TR>
   <TD>DVD-ROM</TD>
   <TD><INPUT TYPE="checkbox" NAME=chkDVD VALUE="DVD-ROM"></TD>
</TR>
<TR>

   <TD>CD-ROM</TD>
   <TD><INPUT TYPE="checkbox" NAME=chkCD VALUE="CD-ROM"></TD>
</TR>
<TR>
   <TD>Zip Drive</TD>
   <TD><INPUT TYPE="checkbox" NAME=chkZip VALUE="ZIP Drive"></TD>
</TR>
</TABLE>
<P>
Select the processor speed you require
<TABLE>
<TR>
   <TD><INPUT TYPE="radio" NAME=radCPUSpeed CHECKED
      onclick="return radCPUSpeed_onclick(0)" VALUE="800 MHz"></TD>
   <TD>800 MHz</TD>
   <TD><INPUT TYPE="radio" NAME=radCPUSpeed
      onclick="return radCPUSpeed_onclick(1)" VALUE="1 GHz"></TD>
   <TD>1 GHz</TD>
   <TD><INPUT TYPE="radio" NAME=radCPUSpeed
      onclick="return radCPUSpeed_onclick(2)" VALUE="1.5 GHz"></TD>
   <TD>1.5 GHz</TD>
</TR>
</TABLE>
</P>
<INPUT TYPE="button" VALUE="Check Form" NAME=butCheck
   onclick="return butCheck_onclick()">

</FORM>

</BODY>
</HTML>
Save the page as ch6_examp6.htm and load it into your web browser. You should see a form like the one below:
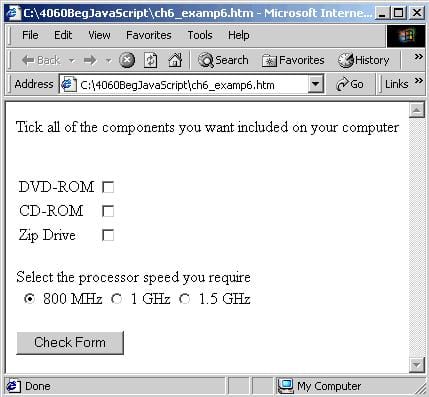
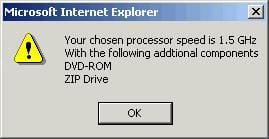
Tick some of the checkboxes, change the processor speed and hit the Check Form button. A message box will appear giving details of which components and what processor speed you selected. For example, if you select a DVD-ROM and a Zip Drive, and 1.5GHz processor speed, you will see the following:
Note that the 1 GHz processor is out of stock, so if you choose that, a message box will appear telling you that it's out of stock, and the 1 GHz processor speed radio button won't be selected. The previous setting will be restored once the user dismisses the message box.
Let's first look at the body of the page, where we define the checkboxes, radio buttons and standard button inside a form called form1. We start with the checkboxes. They are put into a table simply for formatting purposes. No functions are called or events are hooked into.
<TABLE>
<TR>
   <TD>DVD-ROM</TD>
   <TD><INPUT TYPE="checkbox" NAME=chkDVD VALUE="DVD-ROM"></TD>
</TR>
<TR>
   <TD>CD-ROM</TD>
   <TD><INPUT TYPE="checkbox" NAME=chkCD VALUE="CD-ROM"></TD>
</TR>
<TR>
   <TD>Zip Drive</TD>
   <TD><INPUT TYPE="checkbox" NAME=chkZip VALUE="ZIP Drive"></TD>
</TR>
</TABLE>
Next come the radio buttons for selecting the required CPU speed, which are a little more complex. Again they are put into a table for formatting purposes.
<TABLE>
<TR>
   <TD><INPUT TYPE="radio" NAME=radCPUSpeed CHECKED
      onclick="return radCPUSpeed_onclick(0)" VALUE="800 MHz"></TD>
   <TD>800 MHz</TD>
   <TD><INPUT TYPE="radio" NAME=radCPUSpeed
      onclick="return radCPUSpeed_onclick(1)" VALUE="1 GHz"></TD>
   <TD>1 GHz</TD>
   <TD><INPUT TYPE="radio" NAME=radCPUSpeed
      onclick="return radCPUSpeed_onclick(2)" VALUE="1.5 GHz"></TD>
   <TD>1.5 GHz</TD>
</TR>
</TABLE>
The radio button group name is radCPUSpeed. I've set the first one to be checked by default by including the word CHECKED inside the <INPUT> tag's definition. It's a good idea to ensure that you have one radio button checked by default. Without this, if the user did not select a button, the form would be submitted with no value for that radio group.
We're making use of the onclick event of each Radio object. For each button we're connecting to the same function, radCPUSpeed_onclick(), but for each radio button we are passing a value, the index of that particular button in the radCPUSpeed radio button group array. This makes it easy to work out which radio button was selected. We'll look at this function a little later, but first let's look at the standard button that completes our form.
<INPUT TYPE="button" VALUE="Check Form" NAME=butCheck
   onclick="return butCheck_onclick()">
This button is for the user to click when they have completed filling in the form, and has its onclick event handler connected to the butCheck_onclick() function.
So, we have two functions, radCPUSpeed_onclick() and butCheck_onclick(). These are both defined in the script block in the head of the page. Let's look at this script block now. It starts by declaring a variable radCpuSpeedIndex. This will be used to store the currently selected index of the radCPUSpeed radio button group.
var radCpuSpeedIndex = 0;
Next we have the radCPUSpeed_onclick() function which is called by the onclick event handler in each radio button. Our function has one parameter, namely the index position in the radCPUSpeed[] array of the radio object selected.
function radCPUSpeed_onclick(radIndex)
{
   var returnValue = true;
The first thing we do in the function is declare the returnValue variable and set it to true. We'll be returning this as our return value from the function. In this case the return value is important as it decides whether the radio button remains checked as a result of the user clicking it. If we return false then that cancels the user's action and the radio button remains unchecked. In fact no radio button becomes checked, which is why we keep track of the index of the checked radio button so we can check the previously checked button. To allow the user's action to go ahead we return true.
As an example of this in action, on the next line we have an if statement. If the radio button's index value passed is 1, that is the user checked the box for a 1 GHz processor, then we tell them that it's out of stock and cancel the clicking action by setting returnValue to false.
   if (radIndex == 1)
   {
      returnValue = false;
      alert("Sorry that processor speed is currently unavailable");
      document.form1.radCPUSpeed[radCpuSpeedIndex].checked = true;
   }
I mentioned above that canceling the clicking action results in no radio buttons being checked, so to rectify this we set the previously checked box to be checked again in the line:
document.form1.radCPUSpeed[radCpuSpeedIndex].checked = true;
What we are doing here is using the Array object for the radCpuSpeed radio group. Each array element actually contains an object, namely each of our three Radio objects. We use the radCpuSpeedIndex variable as the index of the Radio object that was last checked, since this is what it holds.
Finally in the else statement we set radCpuSpeedIndex to the new checked radio button's index value.
   else
   {
      radCpuSpeedIndex = radIndex;
   }
In the last line of the function the value of returnValue is returned to where the function was called and will either cancel or allow the clicking action.
   return returnValue;
}
Our second function, butCheck_onclick(), is the one connected to the button's onclick event. In a real e-commerce situation this button would be the place where we'd check our form and then submit it to the server for processing. Here we use the form to show a message box confirming which boxes you have checked, as if you didn't already know!
At the top we declare the four local variables, which will be used in the function. Variable numberOfControls is set to the form's length property, which is the number of elements on the form. Variable compSpec is be used to build up the string that we'll display in a message box.
function butCheck_onclick()
{
   var controlIndex;
   var element;
   var numberOfControls = document.form1.length;
   var compSpec = "Your chosen processor speed is ";
   compSpec = compSpec + document.form1.radCPUSpeed[radCpuSpeedIndex].value;
   compSpec = compSpec + "\nWith the following addtional components\n";
In the line:
compSpec = compSpec + document.form1.radCPUSpeed[radCpuSpeedIndex].value;
we add the value of the radio button the user has selected to our message string. The global variable radCpuSpeedIndex, which was set by the radio button group's onclick event, contains the array index of the selected radio button.
An alternative way of finding out which radio button was clicked would be to loop through the radio button group's array and test each radio button in turn to see if it was checked. The code would look something like:
var radIndex;
for (radIndex = 0; radIndex < document.form1.radCPUSpeed.length; radIndex++)
{
   if (document.form1.radCPUSpeed[radIndex].checked == true)
   {
      radCpuSpeedIndex = radIndex;
      break;
   }
}
Anyway back to the actual code. You'll notice I've thrown in a few new line (\n) characters into the message string for formatting reasons.
Next we have our big for statement.
for (controlIndex = 0; controlIndex < numberOfControls; controlIndex++)
   {
      element = document.form1[controlIndex];
      if (element.type == "checkbox")
      {
         if (element.checked == true)
         {
            compSpec = compSpec + element.value + "\n";
         }
      }
   }
   alert(compSpec);
}
It's here that we loop through each element on the form using document.form1[controlIndex], which returns a reference to the element object stored at the controlIndex index position.
You'll see that I've set the element variable to reference the object stored in the form1[] array at the index position stored in variable controlIndex. Again this is for convenient shorthand purposes, as now to use that particular object's properties or methods, we just type element and dot and then the method or property name, making our code easier to read and debug, and saving on typing.
We only want to see which check boxes have been checked, so we use the type property, which every HTML element object has, to see what element type we are dealing with. If the type is checkbox then we go ahead and see if it's a checked checkbox. If this is so, we append its value to the message string in compSpec. If it is not a checkbox, it can be safely ignored.
The final thing to do is use the alert() method to display the contents of our message string.
Controlling Data Entry Using Form Fields
Creating 'Encoded' Name & Value Pairs
Passing data from one form to another
Addressing Form Field Validation with Regular Expressions and JavaScript 1.2