You are here: irt.org | Articles | Graphics | Photoshop - Graphics Workshop #1 [ previous next ]
Published on: Sunday 26th July 1998 By: Josh Sahrmann
Photoshop is one of the best graphics program that I've used to create banners and images for web sites and catalogs. The most challenging problem is creating an image that looks nice and can be changed on the fly. To do this while keeping the image in the same image face I use layers to create a better work ground for my self.
For this article I want to just jump right in and get started. I'll be using pictures to show the exact work and I hope you can follow along and create images that are better then those shown here. So start up Photoshop and get ready for some art fun.
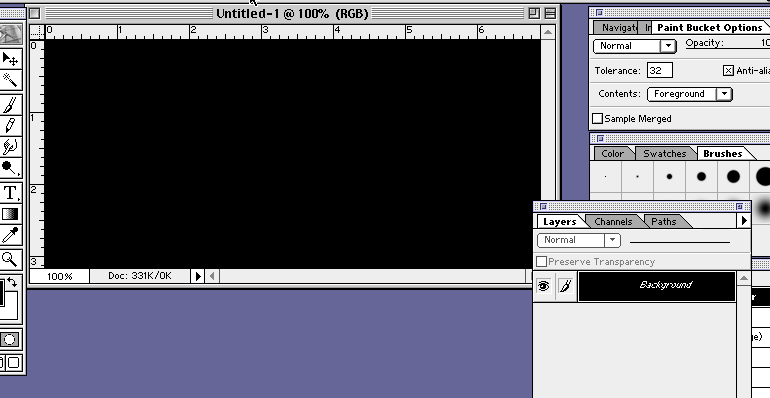
The first step is to create your background. I like to start out with black because I can bring out the detail in the image without a real problem.
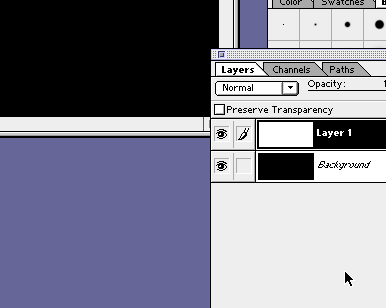
Here you will need to click to create the new layer. What this does is allow you to create separate images and edit them with outediting the back images. This becomes useful for large images or images that are shown on multiple web pages but have different backgrounds (If your web site has different background please use transparent images).
![]()
Once you've created your new layer you can begin typing in text. Once you have typed in your text you will notice that it is now layered on top of the background layer. To jump back to a layer you need to click on the window that isn't labeled but has a table saying "Layers."
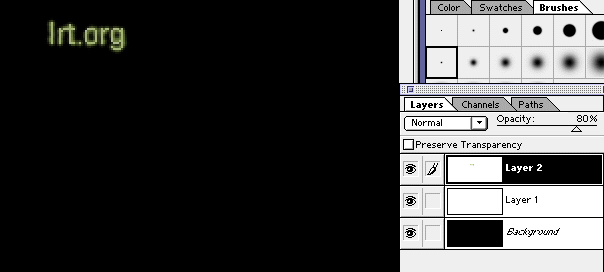
Now that I've typed in Irt.org I think I want to make a glow behind Irt.org to make it more of a 3D image. To take care of any problems I'm going to make another layer. This layer will be the glow part. To get the glow I'm going to select the brush and trace the outside of the letters using a greenish color.
So the image has a glow behind it now but really looks bad. To add final touches I'm going to make the Irt.org layer a bit lighter. To do this you need to jump pack to that layer. Once you've arrive you will see a bar in the upper corner of that window labeled "Opacity:." You will need to move this bar till you find the lightness of the Irt.org which looks good to you.
But its still a bit messy, so to clear things up we are going to use the blur effect. To do this effect you will need to go under the Filters and find blur. Highlight blur and let go of your mouse. The image should become a bit blurry. If you feel the need to add more blur you can find this option at the top of the Filters list as the last Filter you've used.
So now your image is ready to be saved. To do so you will need to go to Image and then to Mode. Find Indexed Image and click on that. Once you've highlighted Indexed you will be asked what color type you want. If you're not familiar with color types then just hit OK. Your image has then been changed to a new format. Its at this point that you need to go to the File menu and save your work.
When saving you will lose your layer options. To stop this from happening you need to save a working copy before you change your image mode and save your production image. This will allow you to rework the layers on the working copy.
If you are interested in buying Adobe Photoshop, you can order it now (US only) at a discount price direct from software.net. Just click on a link below and you'll be taken to an appropriate order page:
Adobe Photoshop 5.0 Full version (Win 95/NT)
Adobe Photoshop 5.0 Full version (Macintosh)
Adobe Photoshop 5.0 Upgrade (Win 95/NT)
Adobe Photoshop 5.0 Upgrade (Macintosh)